Recently I had to prepare a complete mocked server for an app I worked in the past. The reason mocking was required so that app’s different functionality can be showcased with a variation of mocked response which triggers different UI and functionality.
There may be different solutions available in the market, however, since Firebase has a free tier and the Node.js-based Express web framework makes things much easier to customize based on need.
Google has many many examples for cloud functions which showcase 100s of use cases, however, I just wanted to focus on using Express to mock API responses.
UPDATE (Feb 2021): This article may be outdated. Firebase now requires Node 11 and up and a payment method is required to use the free tier. It may not be possible to provide a credit card. Just keep these in mind and follow official documents on how to deploy node app.
What will this guide touch on?
- How to create a Firebase project
- How to deploy on Firebase project
- Configure Firebase project for mocking using hard-coded data
- How to add new APIs that mimic what you want
- How to use Firestore database to provide mocked data
- Troubleshooting - some known issues and their solutions
Setup & Deploy Firebase
First, go to https://console.firebase.google.com/ and click on “Add Project” and name it to complete the project creation step.
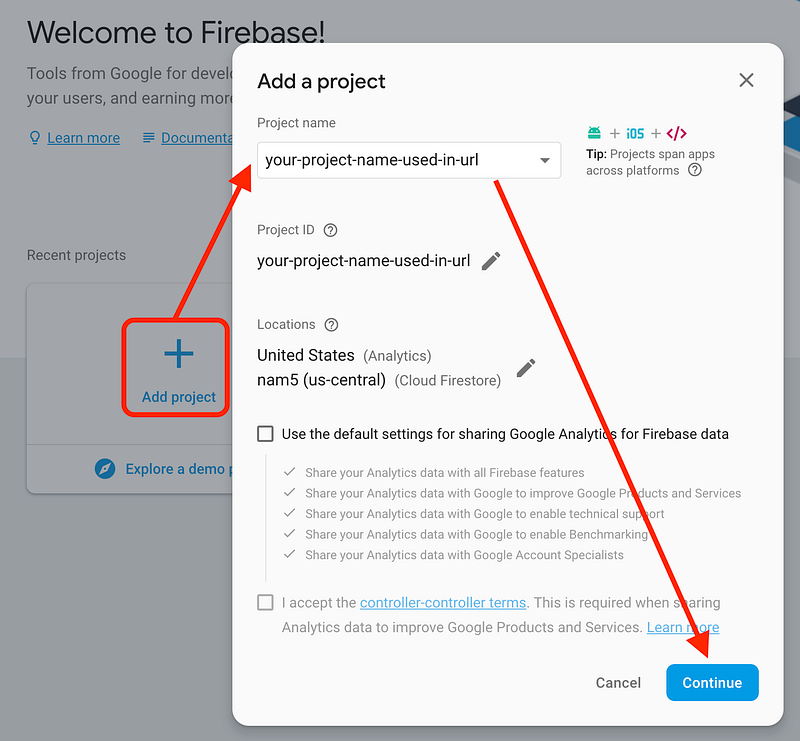
Create project. Note: The project ID will be visible in URL used in mocking.
If you don’t have “Firebase CLI” installed, follow steps from https://firebase.google.com/docs/cli/ to install the Firebase CLI. This will allow you to update code to deploy mock server to Firebase.
Run **firebase projects:list** command in terminal to validate the project you just created shows up in the list.

Now, go to a new directory and initialize a new firebase project by running the following command:
firebase init
Select “Functions” and “Hosting” by going up and down and pressing space to turn on the option. Then press Enter. Note that “Hosting” is not required however, if you want to host mock image or video, you will need hosting.
Use default options for the firebase init wizard. We will update some configuration later. Once initialization is completed, link your newly created firebase project with the current directory project by executing the following command with your project ID you just created:
// "your-project-id-23d6x" is the ID from "firebase list" command.firebase use --add your-project-id-23d6xNow, try deploying barebone project to see everything is working by running **firebase deploy**. Once the project is deployed, you will see a public URL in the console (eg. https://your-firebase-appid.firebaseapp.com/) and use that to verify that default index.html content for Firebase is shown.
Use Express for Mocking
Now that the default project is up and running, it’s time to setup Express so that we can define our API that mimics what we want.
First, update rewrites rule of /firebase.json to forward all requests to Firebase Cloud Function.
"rewrites": [
     {
        "source": "**",
        "function": "api"
     }
]
See github-sample for reference.
Now, update /functions/package.json file to include express and cors under "dependencies".
"dependencies": {
   "cors": "^2.8.5",
   "express": "^4.16.4",
   // .... more dependency here
}
See github-sample for reference.
Once this is done, you need to update npm modules so that Express can be used. Use the following commands to update it.
cd functions
npm install
cd ..
Now, you have express ready to be used in /functions/index.js. Open **index.js** and remove any previous content, and apply the following:
Now that app is an Express instance, you can start defining APIs using routing rules. Here is a simple example that provides the hard-coded response for /say/hello API.
NOTE: All the APIs must be added before “exports.api = …” line.
See GitHub example with HTTP ‘get’ & ‘post’ API with a dynamic response based on request data. The example also shows how you can load large data from JSON file, which keeps the “index.js” file clean from hard-coded data.
Once you are done adding APIs, you can run **firebase deploy** from root of the project to deploy your APIs.
NOTE: If you are getting HTTP 500 error - Your client does not have permission, then see troubleshooting section at the end of this article.
Here are some example APIs that are available from the example GitHub project.
- https://mock-apis-server.firebaseapp.com/say/hello?name=Ryan
- https://mock-apis-server.firebaseapp.com/photos/29647
UPDATE#1: Use Firebase firestore database for mocked response
If you want to dynamically update content and don’t want to keep updating JSON file and re-deploy each time, then using Firestore is a perfect solution. Using firebase console you can update response data which will be immediately reflected on next request. You can also add/remove fields to simulate error handling.
To use Firestore, you need to enable database and create a collection(like table) to store data.
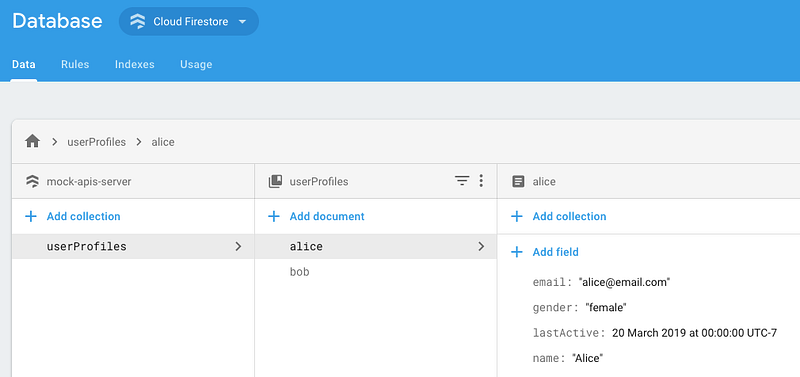
Here is an example, where “userProfiles” is a collection of user profile info.
Here is a partial example on how to access the data from the Firestore collection
Now, using the Firebase console, you can modify the contents and the next API request will reflect the new data.
Happy mocking 😃!
firebase-mock-api-server
A simple mock API server using expressjs that is hosted on firebase.
Troubleshooting Guide
While following my guide later, I have encountered some issues that I did not see before. I am going to list them here, in case you are experiencing the same issue.
Firebase - Your client does not have permission to get URL from this server

Screenshot showcasing what it should look like after adding the `allUsers` role .
This can happen if your Firebase project does not have the right permission to allow any unauthenticated users from accessing the APIs. In that case, you need to add allUsers to “Cloud Function Invoker” role. That essentially allows anybody to access this API (less secured obviously, but I assume this is only mock data and for testing only).
You can add that permission by going to https://console.cloud.google.com/functions and selecting the project from the drop-down at the top bar (beside “Google Cloud Platform”).
Here is a screenshot showing how to add a new member role.
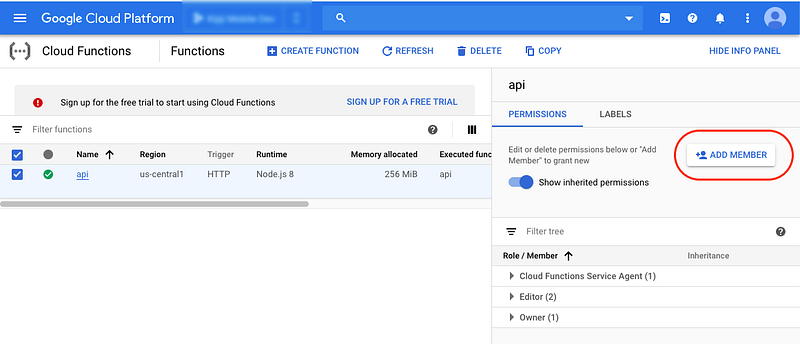
On “Add Member” screen, select the following and click “Save”:
- New members:
allUsers - Role:
Cloud Functions>Cloud Functions Invoker
Now, retry your API, it should succeed without any error 👍
Error: Refresh token must contain a “client_secret” property.
This is something I recently got after adding some Firebase Firestore code in the cloud functions, I could not push code using firebase deploy. After some Googling, I was able to find a solution from Github issues by Brandon
After upgrading to Mac OS Catalina I encountered this issue. What resolved it for me was running the following commands:
firebase login
// Or try following:
export GOOGLE_APPLICATION_CREDENTIALS="<SERVICE_ACCOUNT_KEY_JSON>"
For me, trying firebase login worked.
If you have followed the steps and feel some parts are broken or not explained properly, please do leave a comment. I will update the guide accordingly.